Note: I have skipped one part in this tutorial, which will be a short introduction to Web technology aimed at smart card developers. It turned out to be more difficult to write than expected.
The title needs to be qualified a little more, as our first Java Card 3.0, Connected Edition pogram. The reason is that anybody who has already written a Java Card 2.2 application has already written a Java Card 3.0 application,in its Classic Edition. For now, we will focus on the Connected Edition.
Following a long tradition, our first example will be an application that is able to display an Hello, world! message. This time, the application will also be able to display anything we type, as it is an Echo application, which displays whatever we enter into it.
Naturally, this application is a servlet, which is the standard application model for the Connected Edition. Actually, such a simple example, which does not use any feature specific to the Java Card platform, such as persistence, is indistinguishable from a standard servlet. This shows in the first lines of the application:
package com.vetilles.echo2;

import java.io.IOException;
import java.io.PrintWriter;

import javax.servlet.http.HttpServlet;
import javax.servlet.http.HttpServletRequest;
import javax.servlet.http.HttpServletResponse;
The only classes that we are importing here come from the standard Java framework (java.ioand from the Enterprise Edition servlet framework javax.servlet.http). next, we define our servlet class, and the only thing that we need to do is to override the doGet method:
/**
 * A Simple Hello Servlet.
 */
public class EchoServlet extends HttpServlet {
  @Override
  public void doGet(
        HttpServletRequest request,
        HttpServletResponse response)
           throws IOException {
    String message = request.getParameter("message");

    response.setContentType(“text/html");
    PrintWriter out = response.getWriter();

    out.print(HTML[0]);
    for(int i = 1; i< HTML.length; i++)
    {
        out.print(message);
        out.print(HTML[i]);
    }
  }
This code is very simple, and it does the following sequence of operations:
- First, it gets the value of a parameter labeled
messagefrom the request. - Then, it starts the response, by first declaring that the response will be encoded in HTML.
- Then, the servlet gets the writer ojbect in which it will need to output its message.
- Finally, it outputs its message by looping through an array of strings.
Once we get there, there are still a few things to do. In particular, we need to declare the array of strings that we will display:
  private static final String HTML[] = {
      "<html><header><title>Echo 2</title>"
    + "<link rel=\"stylesheet\" href=\"/echo/echo.css\""
    + "type=\"text/css\"></header>"
    + "<body><center><h1>Echo 2</h1><br>"
    + "<font class=\"text\" color=\"#000000\">" , "</font><br>"
    + "<font class=\"text\" color=\"#444444\">" , "</font><br>"
    + "<font class=\"text\" color=\"#888888\">" , "</font><br>"
    + "<font class=\"text\" color=\"#cccccc\">" , "</font><br>"
    + "<br><br>"
    + "<p class=\"note\">this servlet runs on a Java Card.</p>"
    + "<br><br>"
    + "<a href=\"/echo/index.html\">Same player shoot again</a>"
    + "</center></body></html>"};
  }
}
Well, that's not a pretty sight. Including HTML in Java strings is not usual.
In mos Web applications, Java Server Pages (JSP) are used, in which the Java
code is inserted into HTML code, and that looks much better. However, JSP
is not available in the Java Card framework, so we can only look at pure
servlets.
We will see later how to remove the amount of HTML actually included in your
code, by using include files. For now, here is what your servlet really means
<html>
  <header>
    <title>Echo 2</title>
    <link rel="stylesheet" href="/echo/echo.css" type="text/css">
  </header>
  <body>
    <center>
      <h1>Echo 2</h1><br>
      <font class="text" color="#000000"> Message </font><br>
      <font class="text" color="#444444"> Message </font><br>
      <font class="text" color="#888888"> Message </font><br>
      <font class="text" color="#cccccc"> Message </font><br>
      <br><br>
      <p class="note">This servlet runs on a Java Card.</p>
      <br><br>
      <a href="/echo/index.html">Same player shoot again</a>
    </center>
  </body>
</html>
This is a straightforward file, which declares a stylesheet named
echo.css, and then writes four times the same message (as
provided in the query), and finally includes a paragraph and a link.
This actually concludes the code of our servlet application, which is about
as short as one can expect. However, it does not conclude the application,
which also needs to include a lot of additional information. This information
will then be bundled in a WAR file, ready for distribution. The content of the
file is shown in the diagram below:
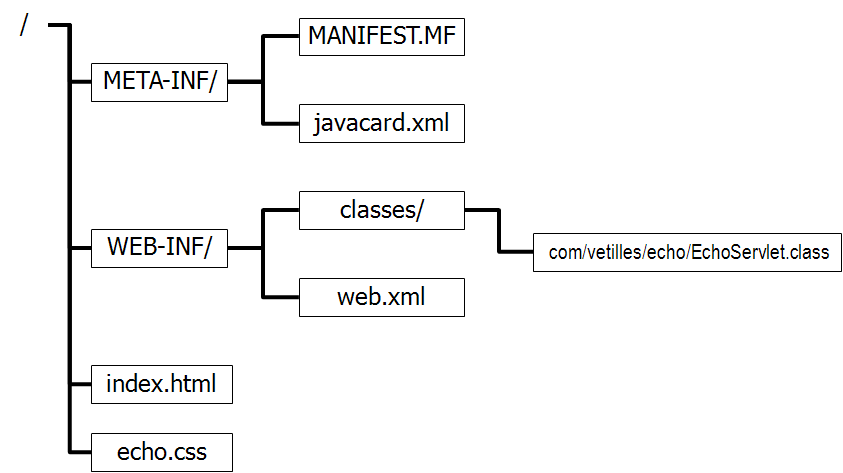
WAR file content
First, we have the static files, that will be directly served by the
application container. The first of these files is here the index.html file:
<html>
  <head>
    <title>Echo 2</title>
    <link rel="stylesheet" href="/echo/echo.css" type="text/css">
  </head>
  <body>
    <h1>Echo 2</h1><br><br>
    <div class="text">
      <form method="get" action="doit">
        <table>
          <tr>
            <td>Your Message:</td>
            <td><input type="text" name="message"></input></td>
          </tr>
          <tr>
            <td> </td>
            <td><input type="submit" value="Echo"></td>
          </tr>
        </table>
      </form>
    </div>
  </body>
</html>
Tat file includes a very simple HTML form, which asks the user to provide
a message to be echoed. Submitting the value will trigger an HTML GET request
to the server.
Net comes the CSS file, which defines the styles to be used for the application.
Using a separate file to do so allows the look and feel of the Web application to be
handled in a way orthogonal to the application code. The echo.css
file contains only a few style definitions:
a {      background-color: rgb(102, 51, 255);
         font-family: Arial,Helvetica,sans-serif;
         color: rgb(204, 204, 204);
         text-decoration: none;
         font-weight: bold; }

table {  margin-left: auto;
         margin-right: auto;
         border: 0; }

h1 {     color: rgb(102, 51, 255);
         font-size: x-large;
         font-weight: bold;
         font-family: Arial,Helvetica,sans-serif;
         text-align: center; }

.note {  font-family: Arial,Helvetica,sans-serif;
         font-size: small; }

.text {  font-family: Arial,Helvetica,sans-serif; }
These styles are self explanatory. If we consider the first one, which
defines the look of links, we learn that the background color will be some
kind of purple, that the font is going to look like Helvetica, that the text
itself will be grey, without any decoration (in particular, no underline),
and that the text will be typeset in boldface.
Cascading Style Sheets (CSS) are somewhat tricky to use, but they are a vey
basic Web technology, for which many tutorials exist on he Web. You can also
very easily find examples of whatever style you may be interested in existing
applications.
We are now done with the static content, and we can move to the descriptors,
i.e., the files that describe to the container the behavior expected
from the application. The most important descriptor is the Web Application
Descriptor, which is directly inherited (in a simplified form) from the servlet
specification. The web.xml for our first application contains the
following declarations:
<?xml version="1.0" encoding="UTF-8"?>
<web-app
      version="2.4"
      xmlns="http://java.sun.com/xml/ns/j2ee"
      xmlns:xsi="http://www.w3.org/2001/XMLSchema-instance"
      xsi:schemaLocation="http://java.sun.com/xml/ns/j2ee
          http://java.sun.com/xml/ns/jcns/jcweb-app_3_0.xsd">
  <display-name>Echo</display-name>
  <!-- Servlet classes -->
  <servlet>
    <servlet-name>echoServlet</servlet-name>
    <servlet-class>com.vetilles.echo2.EchoServlet</servlet-class>
  </servlet>
  <!-- Servlet Mappings -->
  <servlet-mapping>
    <servlet-name>echoServlet</servlet-name>
    <url-pattern>/doit</url-pattern>
  </servlet-mapping>
</web-app>
The first lines declare the kind of Web application that we are defining, by
referring to a specific schema. Then, the descriptor only defines a few
elementary things:
- The
displayelement defines a name to be displayed during
the development process. - The
servletelement defines a servlet by associating a name
to a servlet class. - The
servlet-mappingdefines the URL patterns associated to
the servlet that we just declared.
This is a minimal Web descriptor, because the servlet is extremely simple, and
also because there are no security declarations at all in this first
application.
The last file that we need here is the manifest, or runtime descriptor. This
file is supposed to contain information related to the deployment of the
application, independently of the application iself. In our case, the
MANIFEST.MF only contains a few elements:
Manifest-Version: 1.0
Application-Type: web
Runtime-Descriptor-Version: 3.0
Web-Context-Path: /echo
Module-Display-Name: Echo
The only really important information here is the Web-Context-Path,
which defines the path in which the information will be accessed.
That concludes the writing of our first Java Card 3.0 application. In the
next post, we will see what happens when we run the application.
No Comments